Monday, October 17, 2011

Color Forecast

Did you know that the color trends for 2012/13 have already been released?  For some of us, we are just barely getting on board with this year's color trend.  How do they decide on the color trends and who decides what's hot and what's not?

Well, Pantone is the leader in the science of color but companies like Sherwin Williams and Benjamin Moore, along with others make their forecast as well.  Generally speaking, each forecast is complementary to one another. 

Color trends are cued by many environmental factors such as the economic climate even the political climate.  In 2008, an election year, the hot color was yellow.  Yellow represents change so it really made sense especially considering we voted in our first Black President.  This country back then was all about change.

2011, our colors were all representative of ESCAPE!  How fitting since we are all trying to escape the bad effects of a limping economy.  Colors leading up to 2012 are bolder, brighter and give a sense of reclamation, even enlightenment.  Faith and belief is big, the battle between light and dark continues.  It's time to take back control and rediscover the values this country was built on. 

Colors for 2012 are about refocusing on what's important, preserving what we have and being enlightened.
  • Neutrals will be a big part of color this coming year and we welcome back a strong neutral
  • Black!!  Yes, black is the new black!! 
  • Metallics will be big and gold makes a come back but silver is still strong.
  • Anything worn, irregular, handcrafted, recycled and repurposed is hot, very hot! Think preservation!
  • Colors will be grayed and weathered
  • Red- think brilliance, passion ie. chili pepper and clay.
  • Blue- Turquoise, and Teal...it's been awhile since we saw teal.
  • Greens- symbolize healing.  They will be bright like lime but also seafoam and moss.
  • Browns- become more important, this is the reclamation part of the color trend representing grounding and deep rooted.
  • Yellow- warm, bright and staturated with color.
  • Pinks- bubblegum pink, bold and bright
I love this color pallette!  It's fresh and fun but I especially like the theory behind the colors.  Nothing is hotter right now than repurposing things and breathing new life into the old.  I'm hoping to build on this even more in the coming year than I have this year.

So, how do you feel about the color scheme for 2012?

Friday, October 14, 2011

Energy Efficiency- part 3

Here's the final energy tip for the week.  When was the last time you changed your furnace filter?  If you can't remember the last time, it's probably time for a change. 

Did you know that filters should be changed every single month?  That is if you are buying the very inexpensive $2 or $3 dollar filter.  There are some filters designed to last three months, sometimes more depending on the manufacture.  Of course you are going to pay more for these types of filters.


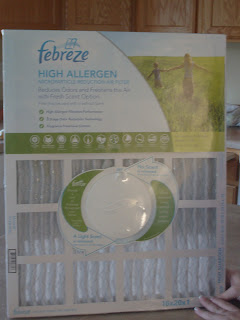
I found this style with a febreze air freshener in it and it lasts 3 months.  I do not have time to remember each month to change my filter so this better fits my needs. 


Nothing like airing my 'dirty' filters!!!  This is the old filter I pulled out of my furnace.  It's been sitting in there since Spring.  That is not the color of the filter, that is dirt!  Disgusting. 

Here's another tip...If you hold the filter up to the light and you can't see the light through it, that's a bad thing!!

Why change the filter?  Well, if you think about it, a filter is meant to, well....filter!!  It's job is to filter dust and other allergens from your home.  Keeping the filter clean will help your furnace run with greater efficiency and keep your house cleaner.  A cleaner filter means less dusting!!   The harder your furnace has to work because of a dirty filter, the higher your utility bills!

I know all of us can save money on heating bills...change those filters.

Wednesday, October 12, 2011

Energy Efficiency part 2

There is another place in your home that lets in a huge amount of drafts and I bet you never knew!  Outlets!  They are big culprit for lost energy.  Test it out next cool day you experience.  Sometimes just putting your hand against an outlet or switch is enough to feel a draft. Sealing up the outlets is super easy.

Again, I started with a DIY kit from Duck.  Duck has all sorts of weatherstripping kits and they are very affordable.  Depending on the size of your house, this kit came with enough to do just about all the outlets in my house. Exterior outlets. 


The material is a spongy, insulation.  Each outlet sealer is in a perforated strip so just tear them off as you need one. 


They fit snugly over your outlet.  Once in place, secure the plastic outlet cover as usual. 


This may seem small and insignificant but it can make a huge difference in your heating bill.  I don't know about you but it's more often the draftiness that makes you chilled to the bone.  Here's hoping winter stays outside instead of inside this year!

Monday, October 10, 2011

Energy Efficiency

 Perhaps you're one of the lucky ones living in a new home or at least a well crafted home.  I am not that lucky.  My house is so drafty all year long.  See the big gap at the top of my front door? 

When it rains, we feel it.  When the wind blows, we feel it.  When the snow flies, it flies through the cracks in the doors.  It is not uncommon for frost to collect at the bottom of my door in the winter. 

 Ideally, I should replace the door, replace the windows, and do a bunch of other things to improve the quality of the house but that is just not feasible right now.  So, the next best thing is to take some steps to at least save the energy I can from escaping and the elements coming in. 

The first thing I did was add weather stripping to the front door.  Nothing could be easier and takes no time at all.  There are plenty of weatherstripping kits to choose from.  I chose a thicker size because it's a sizeable gap. 


Just follow the manufacture instructions which usually involves some easy trimming with scissors.


Clean the door frame with alcohol wipes to ensure a good, tight fit with the adhesive and the wood frame.


Simply apply the adhesive strip.  Voila!  Easy.  Sometimes just stopping the draft makes a huge difference. 

All this week, I will posting more tips on improving the energy efficiency of your homes, easy DIY that make a big difference. 

Thursday, October 6, 2011

Interior Designer vs. Interior Decorator

The two terms designer and decorator seem to be used interchangeably but there are some significant differences between an interior designer and an interior decorator. 

An interior decorator is someone with a knack for accessorizing, combining colors and patterns and has a keen sense of style.  They generally do not have education in the interior design field though they may have taken a class or two.  I have met some decorators who excel at making spaces look great!  Decorators have a place in the market that's for sure. 

In my comings and goings over the years, I run into a lot of people who say, "Can you help me figure out my living room?  I have no clue what I'm doing."  When I meet with them to see the mess I assume they've created because they talked themselves into a ditch about their talents, I find that most people really do know what they're doing.  With a little tweak here and there, it looks great.  Don't second guess yourself when it comes to decorating your home.  There's a decorator in all of us...tap into that.

An interior designer is someone who may or may not have a knack for accessorizing, combining colors and patterns but do typically have a sharp eye for detail and style.  Most importantly, a designer has education; typically 4 years worth and more.  They can have a general, broad education or specialize in a certain field of work just like a doctor.  There are kitchen designers,  health care designers, office systems designers and the list goes on. 

A designer's education is very much like an Architects in fact, a designer can do everything an architect can do with the exception of calculating loads; snow loads, shear walls, the technical stuff.  A designer learns all the principles of good design, space planning, fire codes, building codes and codes for the disabled.  We learn it all and the time spent in school is far more difficult and intense than one may think. 

I am a designer specializing in space planning.  Sometimes, using an interior designer to design your home and office makes more sense than going straight to the architect.  Architects can be pricey.  If your budget is tight, you can often get the space planning and other drawings done by a designer then just pay the architect for the technicalities and it will save you a ton of money in the end.  A designer will work with contractors and other subs to see the construction of your home through. 

So, as your need for design help increases, keep in mind the subtle differences and get the most out of your money!

Wednesday, October 5, 2011

Wreath wrap up

Hopefully, you enjoyed the tutorials this past week.  Sometimes, the smallest things make the biggest difference in the design and look of your home.  None of the wreaths had a lot of cost involved but offered great returns in the style department. 

Through this interior design blog, you will come to learn some great tips for home repair, do it yourself design and articles to help you create a space that is relaxing, inviting and inspiring. 

This winner of their choice of wreath is Tanya C. 

I am looking forward to the growth of this blog and my new company, Inside Story.  Hope you stick around and learn some new things.

Monday, October 3, 2011

Burlap Wreath

Here is the final wreath in my Fall wreath series.  Burlap is a hot trend these days in the world of interior accents.  Again, this wreath is easy and inexpensive.

Supplies needed:
     12" Wreath form
     Burlap strips- One 10"wide by 92" long
                           One 8" wide by 92" long  (You can use two pieces 46" long if you don't have enough length in your yardage)
     Muslin strip- 3" by 80 inches.  Again, you can use smaller lengths and just glue them together
     Chiffon scraps for small flowers
     Hot glue gun and glue sticks
     Needle
     Heavy Thread
     Small brads or beads

First start by wrapping your wreath form in the muslin strip.  You can substitute muslin for linen or burlap.  Secure the ends with hot glue.


Press your burlap strips in half lengthwise then begin stitching a running stitch in preparation for gathering.


Gather up the burlap on both strips.  Adjust the gathers along the wreath before securing with glue


Glue the widest strip down on the wreath first. 


Add the last strip on top of the first, gluing carefully.


Take your linen strip and sketch out a flower design.  I chose a 5 petal flower.  Fold up the fabric and cut out the shape all at once. 


Stack the petals in groupings of three and use a small dot of hot glue to tack the layers.  Add a small brad or bead to the center.


Glue the flowers in place on your wreath.  You can use more or less depending on your taste.


Here is the final wreath.  It is not only cute but sophisticated.  I love the combination of the heavily textured burlap and lightness of the chiffon


So, now that you have learned three new wreath techniques, I hope you are able to create some of your own. 

If you want to be entered in the drawing to win one of these wreaths, leave me a comment on one or all of the wreath tutorial posts and tell me which one you like the most. 

For a second entry, go to my Inside Story Interiors Facebook page and 'Like' it, or you can link this post on your own blog if you don't have Facebook.  Come back here and tell me that you linked this post or 'liked' my Facebook page.
Make sure to check back here on Wednesday to see who the lucky winner is and make sure you contact me with your address info so I can get the wreath to you!!  Good luck!