Tuesday, August 28, 2012

Cabinet Refinishing Part II

Here it is, the end results of my cabinet refinishing experiment.  I am really happy with the results.  I learned a lot and even though I really like it, there are some things I would do differently.  I will get to that in a minute...  Here is the before...
  Here's the AFTER....


What do you think?  Do you like it?  Obviously, now I have to paint the walls.  The contrast is too much for me and it's high time this bathroom got a little attention.  I have big plans for the walls but that is going to be another surprise!  I think I will also replace the flooring.  It's a work in progress and this is a great start! 

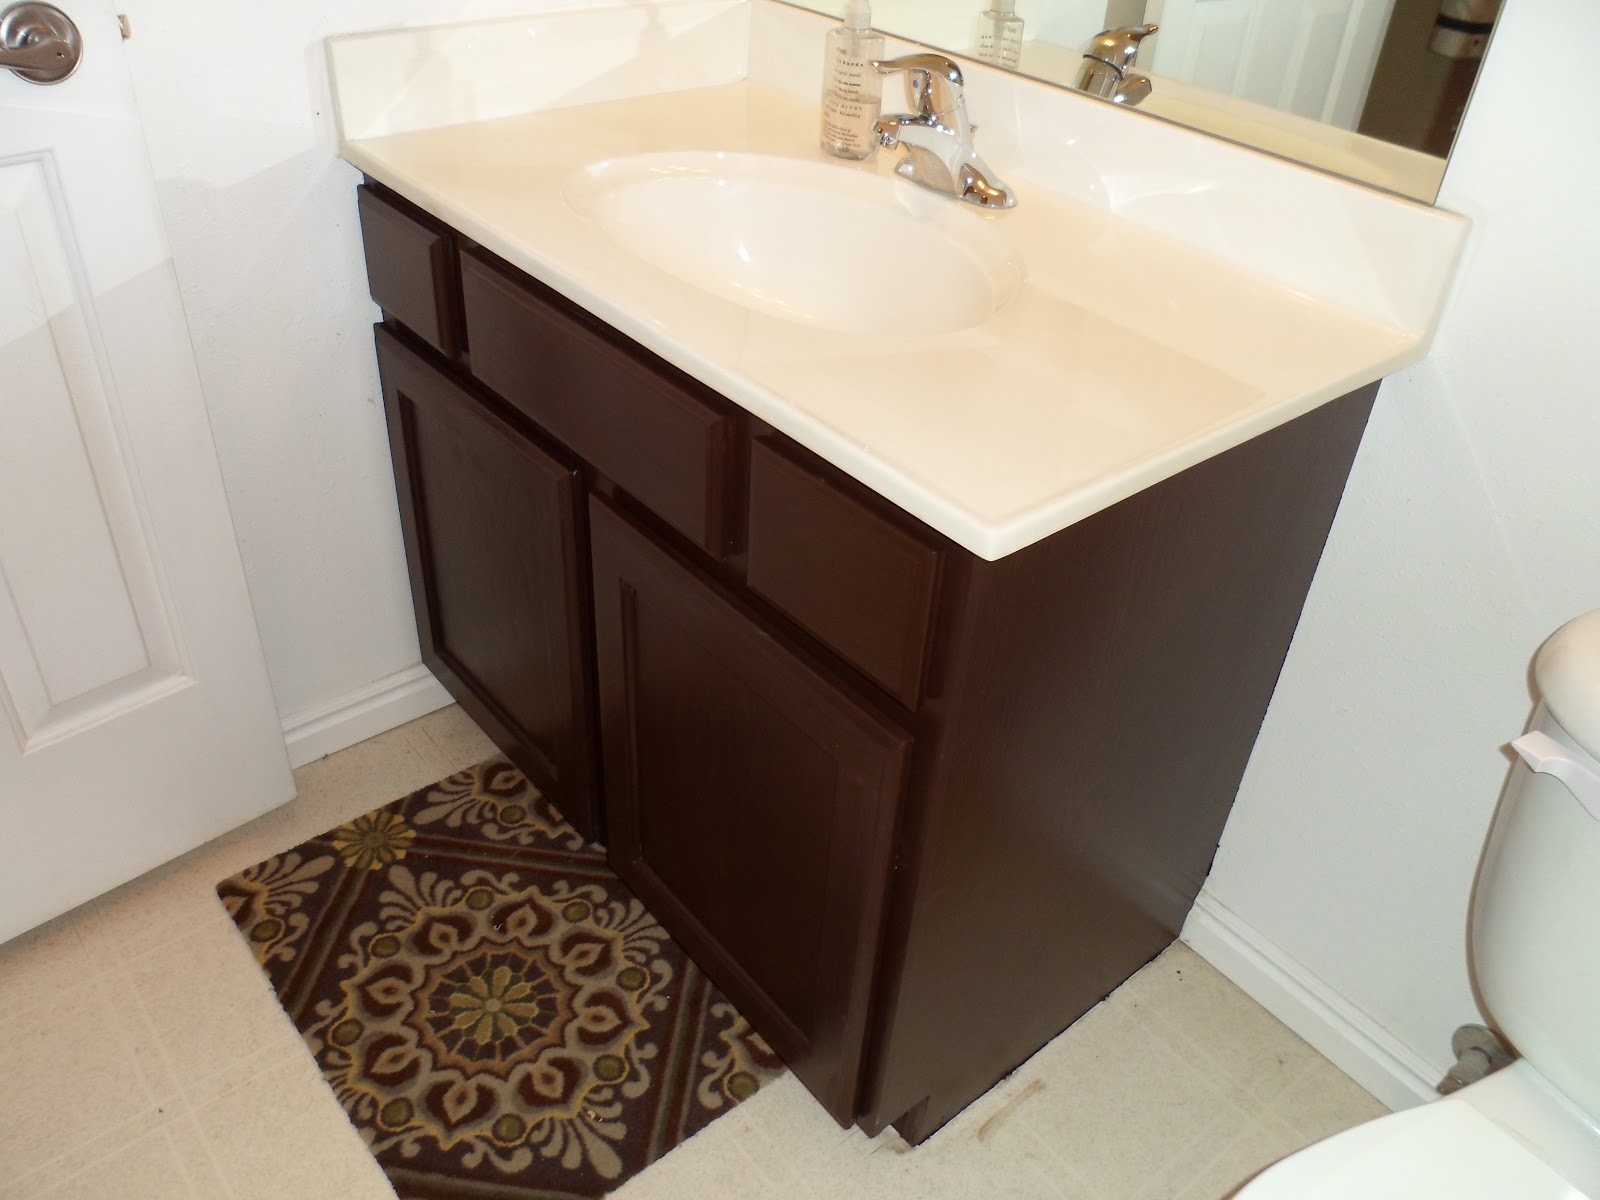
If I decided to refinish my kitchen cabinets, I'm not sure I will use the Rust-Oleum product.  I am interested to see how the bathroom holds up to wear and tear.  It was easy enough and I have enough product to do at least two more bathrooms if I want. 

The one thing that I found difficult was getting the paint in the little grooves of the recessed panels without ending up with big globs of paint.  The final sealer coat was also very difficult, probably the hardest part of the process.  I did end up sanding down a couple of areas and re-touching them.  In a couple of places, I got the finish coat on too heavy and rather than drying clear, it dried white.  That was disappointing. 

All in all, I am pleased with the product and the final results.  It's actually way nicer than I had expected.   I need to decide if I am going to tackle my kitchen cabinets...They are horrible looking, more of the same boring oak.  Here is a kitchen I found in the colors I really want for my kitchen. 
I would do my main cabinets in the cream with a pewter glaze and my island in the pewter grey...so warm and inviting.  I love this kitchen.  I don't love the kitchen I have now.  We'll see.  First things first, finish the bathroom!

Monday, August 27, 2012

Cabinet Refinishing

This weekend, I took on a big project, well, big for me.  A daring project too!  I decided it was time to redo my cabinets.  Golden Oak is fine but I am pretty tired of it and it's all over my house.  I see all sorts of people re doing cabinets these days and they look so nice when they are done.  After doing a lot of reading and research and shopping around for the best refinishing technique, I decided to go with this product.

 I chose the Rust-Oleum Cabinet Transformations because it was an all inclusive package.  I like to keep things simple.  I didn't have time, nor did I want to hunt around the Do It Yourself shops trying to gather all the supplies I needed and risk getting the wrong thing and botching the entire project.  Since this was my first attempt at refinishing anything of significance, I decided to let someone else do the hard work...Thanks Rust Oleum. 

The kit comes with everything and they claim it is easy, fast, simple etc...It was easy.  No sanding or stripping, just one simple step to degloss the cabinets.   Well, it's simple but I think I burned about a 1000 calories rubbing down the doors and frame. 

Anyways, here are some pics of the before and during...

Cabinet before.  I decided to start on a smallish project in case things didn't work out.

I removed all the doors and such then taped off around the floor and walls.

I set up a workspace in the garage.  It was fine but the lighting wasn't as good as it should be even though I had spot lights set up.  Natural, bright lighting would have been better and next time I do this, I will set it up in my kitchen that is flooded with natural light. There weren't any harsh fumes or smells and everything cleaned up easily with water.

After deglossing everything, I added the tinted bond (base) color.  It was pretty streaky and I started getting nervous but after the second coat, it looked much better!
I am really happy with the results and I will reveal the finished cabinet right here on Wednesday!  I added a glaze and the finish coat is done....I can't wait for you to see it!

Friday, August 24, 2012

DIY Bath Mat

I have been working on a really cool diy/repurposing project.  I had a really ragged bathmat, the kind just made out of terry cloth.  It had thin parts in it, even holes.  I decided to try a technique I discovered a couple of years ago by taking other terry towels and sewing strips on top of the old bath mat.  I love the way it turned out!  From start to finish, it was about 6 hours. 

 
Here are the step by steps...
I bought two inexpensive towels from the clearance shelves at a big box retailer.  I paid $2 for each towel.  The project takes two larger towels. 

 
I cut each towel into strips about 1.5 inches wide but you can go wider or more narrow depending on your style and preference.   The beauty of this step is that you don't have to be accurate or completely straight! 

 
You begin anywhere on the mat, even in the middle is fine.  Just start free forming the strips, gathering and puckering slightly as you hand sew each strip to the existing mat.  I did a couple of flowers and went in circles but you could just go back and forth with straight lines instead of the wavy, free form.  Just use a needle and thread with a running stitch.

 
Voila!!  I love the finished product.  It is thick and the texture adds so much interest to an otherwise boring bath mat! 
 
This is such a fun technique and can be used to embellish all sorts of things!  Your imagination is the only limit.   Leave me a comment and let me know what you think!

Tuesday, August 21, 2012

Huge Contrast

Last week, it was all about tiny spaces, this week we look at the opposite end of the spectrum!  Big, beautiful homes!  How would you like to live here?


What a great kitchen!

And another...


This laundry room is pretty sweet!


So, now we've seen the big and the small.  More than likely the majority of us fit somewhere in between!  Even though, this may never be your reality or mine, it's still fun to dream.

Sunday, August 19, 2012

Luxury Homes

Wide open spaces, luxurious rooms, lush furnishings, rich woods, marble, imported finishes...the stuff dream homes are made of!  There's nothing like walking into a big, beautiful home and wishing it was yours, even for one day! 

I love big homes but not just any big home.  I love a well designed, totally functional big home.  Believe it or not, big does not necessarily mean beautiful or functional.  I have seen some pretty dysfunctional large homes in my day.  It's nice to have a large home but don't build or buy so large that the space becomes so big, it's wasted.  Everything should have a place and everything in its place. 

I have designed several large homes, over 6000 sq. ft.  One home I designed even had an indoor soccer court below the basement level!  Sounds extravagent right?  Well, every space in that home had a function, not a made up function but a reason for it's existence, that's important.  Sometimes people dream of big rooms but then when it comes time to fill up that room, they are disappointed to find it really is too big to be functional, then the design challenge is no different than house that is too small and poorly designed.  So bigger is not necessarily better!

Here are some examples,
An Awkward Kitchen.  What is the purpose of the bench on the left.  So much wasted space.
(Photo collegecitydesignbuild.com)
 It's nice to have a large master suite, but this bedroom is ridiculous!  Unless you are having Zumba classes in your bedroom, this is a waste of money both in finishes and architecture.


Not only is this room too big, but the furniture if off scale as well.  Everything looks miniature and dwarfed.  Having a large home still takes some thought and good design is just as important.  Don't get caught up in the dream of big, get caught up in the dream of a well designed, functional home. 

On Wednesday, we will look at some awesome, well designed spaces! 


Friday, August 17, 2012

Alternative Living

Someday, I will live in something than your traditional home. My dream is to live in a Silo!  YES, that's right a grain silo!  Here is one in Utah and I fell in love the minute I laid eyes on it.


Love the sleeping alcoves


I have plans for my own Silo home already drawn up!  I can't wait for the day when my dream of living in it comes true.  Can you imagine life without a mortgage?  Can't wait.  What do you think?  Is silo living for you?

Wednesday, August 15, 2012

Tiny Designs Pack a Punch

This week we are focusing on the smaller home movement here in the US.  When you make the move to a small home, you have to be able to think outside of the regular parameters.  For example, small homes don't have formal living rooms, grand pianos, or eating areas outside of the kitchen space. 

You will not find extravagent mud rooms and laundry rooms, expansive master suites or playrooms and home offices.  There won't be any walk in closets or kitchens to entertain in.  You may find some of these things, but they will be disguised as something else that functions as more than one things.  Here some ideas to inspire you?  Lots of ideas!! Notice how clean and simple the lines are in each picture.   This makes a small room appear much bigger. 

Bedrooms become alcoves

Built in Beds combined with living space.  I would have heavy curtains on those loft beds to create a little more privacy

Combined sleeping and living area

My ultimate favorite!! Lighting, privacy and storage below and in the alcove!  Great Design

Tiny kitchen, love the table!

Small but classy!


Love the clean lines

Small scale on a kitchen classic

There is a lot of function packed into this small space

Perfect!

As you can see, small doesn't mean skimping on nice materials.  It does however mean there is no room for a poorly designed space.


Monday, August 13, 2012

Living In Less

    I do alot of organizing and cleaning for people and the one thing I notice is how much stuff we seem to collect.  Stuff that seems so very important.  Stuff that someone gave so and so a half a century ago and although it is tattered and dirty, sitting in a corner of your basement, you can't seem to part with it.  So much stuff, there is hardly room for the people who live in the house. 

    Does any of this sound familiar?  Are you a pack rat or a minimalist?  Do you love a big house or something small and simple?  This week's posts are all about living in less.  The small home.  It's not for everyone but sometimes,  it's fun to flirt with the idea of living a simple life.

Here are some great small homes!  There is a big movement in the United States towards smaller homes.  It really does make sense, but it's not for everyone. 

There's small...
Photo Courtesy of homeliving.net

Photo Courtesy of geminiweb.com

Photo Courtesy of busyboo.com

And then there's TINY!!

My personal favorite...A Shipping Container!!!  Photo Courtesy of inhabitat.com

I could move right in to this house!  Photo Courtesy of designbooom.com

140 Sq. Ft of great design!  Photo Courtesy of realestate.msn.com
So, what do you think?  Is a small home for you?  On Wednesday, I will show you some of the great design ideas that make a small home work.  You really have to think outside of the box!  See ya soon...

Friday, August 10, 2012

Pillows

Want to really change things up but don't have the budget for an entire redesign?  Try changing the pillows or adding pillows if you don't alread have some.  They don't have to cost a lot and better yet, try to make them yourself?

To save money, I have purchased clearance pillows at discount stores then re-covered them in my own fabric.  They are often less expensive than buying pillow forms. 

There are so many fun embellishments you can add to a simple pillow to really dress it up.  In many cases, you can even use fabric glue to secure your design rather than sewing. Here are some ideas below. 

Ric Rac is wildly popular right now and can be found in lots of colors and sizes

Felt is a great idea.  Recycled sweaters can also make a great sweater and is very inexpensive

Applique and bright colors

What room doesn't deserve a little ruffles and flowers
Pillows are a simple change and a great way to experiment with different colors and patterns with little investment if you decide it wasn't exactly what you were looking for.