Friday, September 30, 2011

Twiggy Wreath

This is part two of my wreath tutorials.  This is by far my favorite wreath!!  When I set out to make this wreath, I didn't have a clear image in my mind of how it would look in the end.  I knew the elements I wanted it to have and once I started collecting the material, it just sort of evolved in my mind.  The best thing about this wreath is that it cost me virtually nothing to make.  I had everything I needed on hand or out in nature.  Here is a picture of the finished wreath.


Now, here is what you need to make your own!
Supplies:  branches collected from dead trees
                an old book you can cut up
                bowl of water
                hot glue gun and glue
                twine
                seed beads
                scissors and exacto knife

I headed out to one of our local parks to collect my branches.  I only selected branches that were dead and laying on the ground so no living trees were destroyed in the process. ;-)  I chose branches that had a nice, gentle curve to them. I liked the fact that one branch even had a couple of dead leaves still attached.

Arrange the branches in the manner you would like in the shape you want.  My wreath is in an asymmetrical shape.  I like to try new things and a deviation from the round wreath is a nice change.

Once you like the way the bundle looks, secure the branches with some twine.  You may also need to add some hot glue it the twine is not enough.


 Next, take your old book and remove several of the pages either with an exacto knife or by tearing.  Be careful if you choose the exacto knife method so you don't get cut.


Cut several random shapes that only need to resemble a circle.  The less perfect the better.  I cut 4 different sizes so I had a nice variety to choose from.  The number will depend on how many flowers you want to make.  I would cut out at least 12 of each shape and size.  Since they don't have to match, you can cut several out at once by stacking the paper. 


Next, soak the cut flowers in a bowl of water just for a few seconds until they feel less stiff.  My paper was old and thicker with a lot of binders in it so I soaked it for about 15 seconds. If your paper is thin, you may only need to get it wet for a second or two.


When taking out the flower, crumple it up to gently squeeze the excess water out.


Un-crumple them but don't flatten them and leave them out to dry.  This gives them some nice, aged dimension.


Place a dot of hot glue in the center of a large petal then layer with a smaller petal, another dot of glue then another small petal.


The glue is hot so I use the end of a pencil to press the centers together


Add another drop of glue to the center of the top petal and drop in some seed beads.


Arrange the flowers on the wreath.  Clusters of odd numbers work the best. Use hot glue to secure the flowers to the twigs.  If you want, you can trail some flowers down the extra twine, if not, just trim the ends of the twine


So, what do you think?  I love this wreath.  Unfortunately, the pictures don't do the beauty of these flowers justice. 

You have to try this! 


Wednesday, September 28, 2011

Fall Wreaths

Fall is well underway, the leaves are turning and will soon be falling.  It's been a great Indian Summer and what better way to celebrate the last few warm days before the snow than sprucing up your front door with a new wreath.  Over the next few days, I will be posting three very simple, very beautiful and very inexpensive wreaths that you can make yourself.  At the end of the wreath series, I will be holding a giveaway so that you can win one of the wreaths!

Today's wreath is a ribbon wreath!  Let's get started. 

Supplies:   A selection of gros grain or satin ribbon.  About 25-28 yards worth
                A wreath form
                Scissors
                Hot glue gun with glue, duct tape

For my wreath form, I used pipe insulation.  I got this long piece from Ace Hardware for 3.99.  It's about 2" in diameter and cuts easily with scissors.  It was long enough for me to make two wreaths.


If you are making your own form you will need to cut a length so that it will make a 12" diameter form.  Duct tape the ends together.  I like this material because it is lightweight as opposed to your typical straw wreath form which you can use but it's way more expensive.


Wrap the wreath in one of your ribbons.  This just helps to hide the ugly color of the form.  Hot glue the ends down so it doesn't unravel on you.


I chose several colors for my wreath.  A striped, chocolate brown, red and gold.  I used a 1 3/4" width satin ribbon.  Cut the ribbon into 17" strips then begin tying onto the wreath.  It's that simple!  Just tie a knot and don't worry about how neat the knot looks.  Messy works too which makes this a great craft, especially for beginners.


Continue tying all the ribbon strips on, making sure to push each knot close to the one before.


Here is the final wreath!  At first, it didn't look like much but once I hung it on my door, it really looked nice.  It's a great change from the usual floral wreath and much easier to construct.  Depending on the ribbon you use, you may need to stop the ends from fraying with a little fray check, clear nail polish or you can singe the edges with a candle flame but be very careful not to burn yourself or catch the ribbon on fire.  It's quick and easy but can be dangerous so burn at your own risk!

Check back on Friday when I will have another wreath to show you.  It is actually my favorite design and I can't wait for you to see it.  When I am done with my spotlight on wreaths, I will be giving one of these wreaths away.  Tell all your friends, link up my blog on facebook, twitter or your own blog then watch for more instructions on how you can win.  It's really easy!  See ya Friday!

Tuesday, September 27, 2011

Tricky...but not really

If you are interested in Interior Design and the decoration of your home, then odds are you love beautiful things and can appreciate all sorts of art forms from cutesy crafts to exquisite art pieces.  Maybe you're like me and follow the trendiest crafting blogs. 

I follow 5 or 6 blogs and there is something I have noticed the crafting world doing.  These die hard crafters scour magazines for things they love then spend a little time figuring out how they can achieve the same look only on the cheap.  Some of them are pretty successful!  Anthropologie and Pottery Barn seem to have the most appeal for knock offs. 

You can easily apply the same concepts as you consider the decor of your home.  You don't have to spend a small fortune to create a pleasing and relaxing space.  As we talk further about decorating on a dime, I will show you some things that are easy to do and create a unique and inspiring look from headboards to desk tops and art for the walls.  This is where your idea file we talked about earlier comes into play.  Look at those files again...are there things you can knock off yourself, make for less...I bet there is, think about it.

I have been busy creating Fall wreaths!  I will be doing tutorials for three awesome wreaths you can do on the cheap.  There will also be a contest so you won't want to miss out!  Tell all your friends then join me here on Wednesday for the first wreath tutorial!

Friday, September 23, 2011

Burlap

My latest and most favorite?  Burlap!  Earlier in the summer, I fell in love with this rug from Urban Outfitters.


I knew I would never be able to afford but it didn't look too hard to make.  I decided to practice on a pillow before taking on such a big project.

Here's how it turned out.  Amazing!!  I was so pleased with the outcome.  I used burlap as the pillow and osnaburg as the embellishment. I love how it turned out!


I loved it so much, I could stop at just one burlap pillow.

A couple of weeks ago, Shelbie did a photo shoot for engagements of a couple who wanted a 'country' look.  I decided to make big burlap pillows that they could throw down in a grassy field as a prop for their pics.  They turned out fun too. 


I am seriously considering burlap as the fabric for my new living room curtains.  It could be fun!

Wednesday, September 14, 2011

Green with envy

Last time, on our color psychology series, we talked about the color grey.  I don't know about you but grey is still one of my favorite colors.  In fact, I'm sewing a grey dress as my latest project and I'm really excited about it. 

Anyways, today is all about green.  Green is probably the most adored color.  Few people have an aversion to green in some shade and form.  Think about the phrase "Green with envy".  It usually means we are feeling 'less than' because of something someone else has.  We see them as 'better' than us because of what they have or who they represent to us.


The most popular connection we have to green is money!  Green represents value. Psychologically speaking, a person choosing green as their favorite color wants to be valued.  They have a need impress others, and wants to be recognized for who they are and what they can offer.  The color expresses itself as perseverance and tenacity.  It is proud, rooted and unchanging. 

Sometimes green can be a longing for improved conditions such as better health or a more useful life.

Physically speaking, green corresponds to the smooth, involuntary muscles.  Sometimes, if you find yourself choosing green when you have never really been that drawn to it before, it can mean you are suffering with digestive problems or ulcers which are generally born out of worry. 

Have you ever noticed that products we use to make us look better, younger, are often packaged in green?  Take a look at the beauty aisle next time, a lot of the packaging, especially packaging for cleansers, age fighting things are green.  Could it be that looking good improves our perceived value?  Interesting how advertisers and marketers use color to their advantage. 

In all the medical facilities I have designed and doctors I have worked with, I  have observed that a doctor either loves green or hates green.  There is no middle shade they will settle on.  I have also found that the younger the doctor, the more they love green.  Perhaps because it is a time in their life when they are trying to find their place, their 'value' in the medical field.  The older, more established doctors tend to dislike green.  They have already proven themselves to their peers and are valued because of what they have accomplished. 

I think the same holds true for just the regular joe like you and me.  People in their 20's and 30's generally love the color green.  They are becoming established, proving themselves, needing and wanting to make money, lots of money and aquiring possessions.  By the time we reach our mid 40's and beyond, we are usually over the intense periods of personal growth.  Life becomes deeper and the meaning of it changes some. 

In my own life, when I got divorced, I fell in love with green.  Not just any green but a bright and vibrant, celery green.  Once I found my 'place' in my new life, I despised the color and couldn't wait to repaint everything I had touched with that green. 

Color is interesting... it tells alot about a person and their life....What is your favorite color?

Thursday, September 8, 2011

Water stains

Last night at dinner, I haphazardly put a hot lasagna pan on my lovely kitchen table.  I had set it on a dish towel but didn't realize that the dish towel was slightly damp.  When I cleared the table, this is what I found.

I was horrified!  I hoped that I could just walk away, let it sit and when I came back it would be magically gone.... no such luck.  I scoured the internet for hints of how to remove the stain.  Several sites suggested mayo.  So, I slathered the table in mayo.


I actually did the mayo trick twice.  Each time I let it sit for 20 min but this was the best I could get it.


I was still not happy with the results and the longer it sat after I cleaned it up, the whole stain eventually came back. 

This morning, I looked for more ideas and one said to place a hot iron over a cotton cloth placed directly over the stain.  I had more doubts about this than mayo.   I spent a good hour, ironing my table...what do you think the outcome was?


It was AMAZING!!!  The stain is totally gone!  I couldn't believe my eyes and actually expected the stain to fade back in through the day but it still looks great! 


I am so relieved.  That would have been sad to have such a horrible stain in the middle of my table.   Apparently this can work no matter how old the stain is. 
So, now you know....

Wednesday, September 7, 2011

Repurposing

Tonight, I am going to be 'teaching' a little class on repurposing.  Mostly repurposing clothes but I am going to throw in a few little home projects that I have been working on as well.  In keeping with the upcycling track I am on these days, here is a little tutorial on refinishing bookshelves.

I bought some pretty nice bookshelves from my friend who passed away.  She had these nice shelves that were pretty narrow in depth which is what I was looking for.  The scale was perfect but I didn't care for the color or wood grain.

So, first step, sanding.  You don't have to sand long and hard, just enough to take the sheen off.  You can see from the picture below, the roughed up shelves. 


The next step is the stain blocking primer.  I did just one coat on these shelves and it worked out fine


After the primer is dry, start with your finish coat.  I mixed my own custom color from cans of paint I already had laying around.  It saved me from having to go out and buy an entire quart of new paint.  One thing to remember when mixing your own colors, mix enough because if you run out, it will be really hard to get the exact shade again.  I had no problems on this project but it's happened before

After applying a couple of coats, let the piece dry.  These shelves looked really nice like this but they were a little 'flat' looking for what I wanted so I did a walnut stain wash over the entire piece.  It gave it a richness you can't otherwise achieve. 

As you can see, I live on the edge...staining on my bedroom carpet but you may want to make sure you completely protect the surfaces you are painting on.  Rubbing the stain in is easy but does take a little practice to get your technique down.  You can't see from these pictures, but I let the stain pool a bit in the edges of the trim and along the corners.  It adds to the aged look.


Painting old pieces is a great and inexpensive way to dress up something old and make it new again.  I think these pieces must have been through the flood because they were pretty musty smelling.  The fresh paint took care of that too. 

Monday, September 5, 2011

The Transformation

So, here is the transformation of my bedroom.  The last post was all about the mess I was in, this post is how I cleaned all that mess up.  Remember the cluttered closet full of books?  This is what that little closet looks like now.  It's my computer closet! 

 I know, it looks a little tight but we love it!  When we are through using it, we just shut the door, mess gone!  It also means, strangers don't have to be wandering in and out of my bedroom.  I just need to get a keyboard tray so it can be mounted below that shelf but that's it.  It has been a functional move.  Have you ever noticed how space is an awful lot like time and money?  If there is extra space, we fill it...but usually with junk.  That big computer desk was just a clutter collector.

What became of the books piled high on my bed...I'll get to that.  For now, this is the bed.  Still a lot of work to be done here.  Paint would be the next logical step but I am hunting down some new bedding.  I am so sick of the brown sueded comforter.  The pink sheets are an improvement from the red but they make me want to get sick.  Pink is just not my color but they will do for now.  Both sets of sheets are over 6 years old and that's old when they were so cheap to start with. 


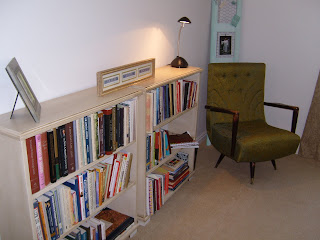
Here is the wall where the coputer desk use to be.  Now it is home to my books!  I love this corner of my room and spend more time than I thought I would.  My books are finally organized!  I have sat down to read books I forgot I had.  I love it.  The chair is an old, old chair I inherited from my Grandma.  It's pretty comfy and though hard to see in the photo, it has threads of the most beautiful shade of blue so I think that will become my accent color.


I have a word to say about bookshelves.  Ideally, bookshelves look really nice when merchandised with accessories rather than wall to wall books.  In my case, these shelves really need to be more functional than beautiful because I have so many books and these are the only shelves I own.  For me, this works.  I love, love books! 

Well, I bet you're wondering what became of the old door I had used as my computer desk?  That door was an old one I found in a house that was being demolished some time ago.  The house was built in the mid 1900's so it was a great find.  I dragged that door home, enhanced the old beauty of it.  I hated to get rid of it altogether so I cut it up and built me a coffee table!  I love the way it turned out!  I kept the old worn edges.  It really helps to anchor the room.