Wednesday, December 5, 2012

Snow man Wreath

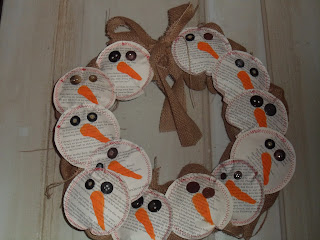
We are getting down to just a few more Christmas gifts.  Today is the snowman wreath.  I love books, I love vintage and I love anything resembling a misfit so that's why I really love these little guys! 

 I have several old vintage poetry books so I tore out some pages and cut a nice round circle.  On one circle, freehand an orange carrot nose for the snowman.
 Next, I took two rounds and zig zagged around the edges, leaving just about an inch open to add the stuffing.   Add just a small amount of stuffing to give it a little dimension, then sew up the opening with the same zig zag stitch. After all the sewing is done, glue two button eyes above the nose using a hot glue gun. I love to mismatch the buttons.

 Using a wire wreath and some burlap, weave the strips of burlap in and out of the wire form until it is covered. 

With your finished snowmen, glue them around the wreath and add a burlap bow.
These little snowman are so cute.  It was fun to see their personalities emerge when the button eyes went on.  I actually like these better as little ornaments rather than on a wreath.  If you don't have vintage books, you can use magazine or newspaper too!

Tuesday, December 4, 2012

Decorated Hand Towels- Christmas Gifts 7

I love bar mop towels!  I love them in the kitchen because when your dishcloths get dirty, you can bleach them and they always look as good as new.  For $2, you can get a set of two bar mop towels.  They are a great size for a hand towel.  I don't have a step by step for this gift but it's easy.  

I chose my favorite cotton fabric and decided how wide I wanted the ruffle.  For these towels, I did a double ruffle.  The top one is about 1 1/2" wide and the bottom ruffle is 3" wide.  Instead of cutting them, I simply tore them from salvage to salvage.  

Using a loose tension and a long stitch, I gathered them up on my machine then placed them on the bar mop towel towards the end and sewed them into place.  So easy!!  

They are going to look so nice hanging in the powder bath!


Monday, December 3, 2012

Bag clips- Christmas gifts 6

Christmas crafts seriously don't get any easier than this!  At first, you may think this is the lamest thing on earth to give as a gift but think again...they are so useful and would make a fun little stocking stuffer.  Seriously, bag clips are those things you just never think of to go out and buy but when you have them, you love them!

Start with a bag of clothes pins!  You get hundreds for next to nothing.


 Once again, choose your favorite scrapbook papers and cut two or each size.  You will end up with one piece longer than the other because you don't want to glue over the small wire piece.

 Modge Podge the pieces on and once they are dry, add a couple more layers of Modge Podge to the top.  Voila!!  The cutest bag clips ever!!

Friday, November 30, 2012

Chunky Frame- Christmas Gift 5

I love chunky frames.  I love a wide frame with a little opening.  Even though it's small, to me, it really emphasizes the picture more.  Here are some steps for you to create your own.

I started with a large, ready made wood frame I purchased from the craft store for $6.00  I also purchased a mini frame for a couple of dollars.  


 I painted both frames black.  After I had this altogether, I was thinking how cool a chalkboard paint would have been!  Chalkboard anything is really popular these days.
 Once everything was dry, I simply glued the smaller frame over the opening of the larger frame using wood glue.  You could also use a glue gun.
That's all there is to it!  Easy and best of all quick!  The possibilities of dressing this up are endless.  You could Modge Podge cool paper or fabric on the frame as an alternative!

Thursday, November 29, 2012

Notebooks- Christmas gifts 4

I can never have enough little notebooks!  I stash them in my nightstand, my purse, in the car, on my desk, in the kitchen and I have even been known to keep one or two in the bathroom.  You know, I get my best ideas when I'm in the shower or blow drying my hair! 

I usually get my notebooks from my favorite store in the world, Barnes and Noble.  There is just nothing like walking in to that store and smelling the fresh ink!  It's the smell of creativity, that's what it is!  I love it.  Anyways, before I get side tracked, they have a fun selection but they can be pretty spendy.  Not anymore, here's a cheap way to make your own.   All you need is a computer, a printer, some cardstock and scissors or paper cutter. 

I have a collection of digital scrapbook paper that I have been acquiring.  It's all been free so that makes this project even nicer.  I chose a couple of my favorites and printed an 81/2 x11 sheet of cardstock.  I decided on the size I wanted for my book.  The finished size of these books is 4x6 so I cut the printed cardstock to 8x6.

Next, take 8 sheets of regular printer paper or any paper of your choice.  Cut it 1/4" shy of your cover measurements both in length and width. 

Fold the cover carefully and the inside papers in half.  Make a crisp fold. 

 Now, here comes the last step.  With your sewing machine, simply sew down the middle of the book, backstitching at the beginning and the end and you are done!  You can't see very well in this picture but I used a contrasting thread for a little surprise.  In this case red!
If you are handy with a photo editing program like Photoshop, you can really customize the cover by adding pictures, a favorite quote or even a cool monogram!  These are perfect stocking stuffers for kids!

Wednesday, November 28, 2012

Hot Pads

Hot Pads, not to be confused with hot mitts.  I love to scatter these on the table to set hot dishes on.  It's nice to create some stylish ones rather than the cheap ones you get at the big box corner store.  They are easy and beautiful.  I started with some scraps of fabric I had.  Here's a tip, if you don't have scraps, you can re-purpose kitchen towels or buy some muslin or osnaburg fabric.  You can usually pick up a yard for $2.  


 Cut your fabric and batting.  I used a special batting called Insul-bright but since you won't be using these for grabbing hot pans from the oven, you could get away with  3 or 4 layers of regular batting.  I used one layer of Insul Bright and two layers of Warm and Natural to absorb the condensation. Cut the squares 9"x 9".
 Adding a Ric Rack trim is optional.  If you are adding that, sew it on to one layer of fabric.  If not, just stack the fabric, right sides together and the layers of batting below.  Sew all together, leaving about 3" to turn it afterwards.
 Turn it right side out and press the edges.  Top stitch close to the edge to catch the open edges then sew a square in the middle just to ensure the batting is secured.  Done!

These are a great addition to any kitchen!

Tuesday, November 27, 2012

Coasters- Christmas gift 2


I love these coasters!  I am not a coaster kind of girl but this was so much fun to do, I think I will make a set for myself to keep in the living room.  Not only do they look cute, I wanted to keep making them. 

I found this little set at our local craft store for 6.99.  It included a little box to stack them in.  If you aren't so lucky, you can go to any home depot and buy ceramic tiles for less than a dollar.  Keep in mind that since you are covering them with paper, you don't necessarily have to buy white tiles. 


I chose some of scrapbook paper from a supply I already had.  Obviously, this is the step where you can choose colors to match your decor.
 Cut the paper so it is just shy of the dimensions of the tile.  You don't want to have the paper overlap the edges of the tile because then over time, the paper will look ragged and lift off or tear.
 Paint the tile with Modge Podge, then position the paper
 Once it dries, which is about 3 or 4 minutes, I lightly sanded the edges of the paper just to knock down that sharp paper edge.   I like the edge of the paper to 'bleed' into the edge of the tile.
After you have sanded, add a layer of Modge Podge to seal the paper and make it waterproof.  Voila!  You have just finished another really fun craft!  Oh, I will add that I actually added a couple more layers of Modge Podge just to be sure but, it does put it a little over the 10 min mark!

Have fun! and we'll see you tomorrow for another really fun tutorial!  Think of all the money you will save this holiday season!

Monday, November 26, 2012

Pin Cushions- Christmas gift 1

I am in love with these pin cushions!!  Simple and fun.  All it takes is a mini picture frame, a little batting and some scrap fabric.  You know what's so cool?  You can lay them down or keep them upright with the stand on the back of the frame!  Genius.  So, here's a little 'how to'.

Mini Frames from Hobby Lobby.  They were originally priced at $7.99 but they were 50% off! I love the white frame. I chose to paint one of the little brown frames, but that is up to you.  Remove the glass and cardboard backing material but leave the velvet door in the back intact, you will use this to keep everything together.

Use the cardboard backing as a pattern to cut 5 layers of batting and a square of fabric. Cut the fabric larger than the cardboard as shown below.

Stack the batting and fabric with the cardboard on the top.  using a glue gun, tack the fabric tot the cardboard so it is tight, like an upholstered seat.

Pop the little 'cushion' back in the frame and secure with the little door on the back of the frame. Done! Isn't it the cutest?

Because I had batting and scraps of fabric, all I had to buy were the frames.  All three frames were under $10.  Batting is less than $5 even if you did have to buy it and would make a ton of these cuties.
If you make one, post it over on my Inside Story Facebook page; http://www.facebook.com/InsideStoryDesigns !  I'm dying to see how your's turned out!

Friday, November 23, 2012

10,10,10

I had so much fun this week making some pretty cool Christmas gifts.  Starting on Monday,  I will be showing tutorials on each of the great gifts so you can save a little cash this holiday season and still give awesome gifts.   Here is an overview of all 10 crafts.  I hope you like them.  They are fresh and fun.

Here's the breakdown.

  1. Mini Frames turned into pin cushions- perfect for the crafter in your life.
  2. Coasters- I have seen these a lot and they are so fun!  Warning, once you start making a set, you won't be able to stop.
  3. Hot Pads- There is nothing worse than putting a hot dish on the table only to find a white ring of condensation when you clear the table.  I love these for scattering on the table at dinner.  Classy!
  4. Personal Notebooks-  I love notebooks.  I collect them and have them everywhere.  These are so fast and easy and fit nicely in a purse.  
  5. Chunky Frames- I have been wanting to make one of these forever!  Love it!
  6. Clothes pins for holding chip bags closed-  This is insanely easy and cheap but I love seeing these rather than the clunky old plastic bag closer.  Customize them to your colors.
  7. Ruffled Bar Mop Hand Towels- I love bar mop towels!  They are on my favorites list.  I love to dress them up with a little ruffle and color!  Looks great hanging in a bathroom or on the oven door.
  8. Snowman Wreath- burlap and vintage snowmen...enough said.
  9. Embellished Monogram- You gotta see this one up close!  The picture doesn't capture the amazing raised floral detail.  Monograms are hot!! This is an easy way to stick with the latest trends.
  10. Let It Go Canvas- I have been dying to create some art!  This was perhaps my favorite craft!  I love the collage look!
On Monday, I will begin posting tutorials on each of these projects with up close and personal pictures!   None of these crafts even came close to $10 which I love!  I will show you some new techniques with plaster, paint and Modge Podge plus a whole lot more so I hope you will join me for a little crafting fun!

Monday, October 22, 2012

Make your own fabric

Choosing fabric is often more like a chore than something enjoyable.  You can spend many a weekends searching for that perfect fabric for that little vintage chair you found awhile back at a local garage sale.

Well, search no more!  Did you know that you can design your very own fabric and have it manufactured then delivered right to your front door?  It's true!  Let me introduce you to Spoonflower!

This is a cool website where you can design your own fabric, wallpaper and even wall decals!  How fun is that.  The price of custom made fabric is in line with what you would pay for designer fabric at a brick and mortar building!

Not into making your own?  Choose from some of their very unique fabric designs!  This is such a fun website a place where you can get lost for a long time!  Can you imagine, custom baby bedding?  So cool!

Here are some of my favorites of their ready made fabrics...


I think I am going to add this to my list of projects to do.  I would love to take some of my kids' artwork and make it into blankets for them.  Wouldn't that be fun?  What kind of design would you submit?

Wednesday, October 17, 2012

Wild for Wallpaper

Wallpaper is making a huge comeback.  It use to be that when you bought a new home, the first thing you did was start stripping layers upon layers of tacky, old wallpaper.  That was no easy chore!  Believe me, I've done it before.  I love this traditional wallpaper in the laundry room.

 It isn't bold and obnoxious, just well stated.

 One of the big trends today is repositionable wallpaper.  Go here to see some great examples of repositionable wallpaper.  Here are some of my favorites from that website.


The great thing about wallpaper that you can move around is just that...you can move it around.  It's easy to install and very forgiving!  You can use it in other places besides the wall.  Perfect for lining the back of a shelf or the inside of drawers for a great design surprise!  How about dressing up a pantry wall with something like this?  Such a fun idea!

Wallpaper is a nice option to paint and something to think about as you add hints of redesign to your home!

Saturday, October 13, 2012

Window Pane Bulletin Board

A couple of  weeks ago, I started a DIY project with these two old window frames I had.  I decided to make them into really cool bulletin boards... Below is the tutorial and the final project.  You will love this!

 First of all, I measured each open pane and cut a piece of 1/4" birch plywood to fit each pane.  I also cut cork to fit each piece of wood.  Once each piece is cut out, I glued the cork to the board with a strong adhesive and allowed it to dry.  While it was drying, I spray painted the window frames in a black lacquer.  (Not Shown)

 Once the cork was dry on the wood, I cut  3 layers of Warm and Natural to fit then began upholstering each piece in Osnaburg.  Once I was down upholstering, I simply nailed each wood piece into the open panes!
 Voila!! I love the way it turned out!  I stenciled on a Fleur De Lis in the larger square.

 It's a perfect piece for my little office nook.  I have one little wall in the loft that I have carved out for my office.  It's really taking shape.  Just a few more things I want to do before I really love it!

You probably can't see very well, but I made some cool stick pins for the bulletin board.  More on that later!  Tell me what you think!

Monday, October 8, 2012

Hidden History

I've said it before, every home has within it's walls a story.  A story about your family, your comings and goings, your triumphs and tragedies.  Think about it... there's a lot of stuff going on in the walls of the place you call home. 

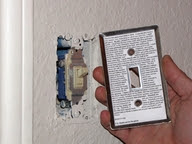
I love this idea I found on Pinterest.  One blogger wrote down the story of how their family came to be in the home. Include when you bought it, any remodeling you did and even funny stories to remember.  Was this your first home?  Did your husband carry you over the threshold?  When you are completed your creative account of your home, hide it behind a switch plate and it becomes like a time capsule of sorts.  


I was thinking it would be fun to take this idea even farther; write a story about each room in the house.  Have the kids write about their bedroom.  The things they love about it and how they spend their time.  You will find that the rooms take on a character for themselves.  It's a fun project for a family to tackle.  Don't forget to include interesting facts about the yard too!  Do you gather together every Sunday afternoon for lemonade on the front porch swing?  

What would the walls of your home say about you?

Monday, October 1, 2012

Fall Decorating

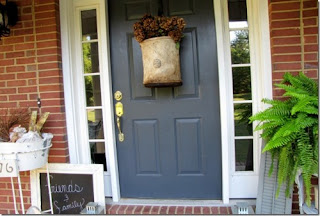
I hate to admit this, but I'm really looking forward to Fall!  It's been a great Indian Summer so far but now it's time to clean up the dead flowers and make room for some exciting decor not just in your home, but on the front porch and door.

It's a great time to switch out your accent colors, trade the cool blues for some deeper, warmer tones of blue.  Tangerine continues to be a huge color trend and kind of tempting to experiment with.   Here are some of my favorite entries I have found and so easy to do.

I love the wreath!  Just simple.  Notice the repetition and symmetry.  It makes for a clean look, classic!

This entry just makes you want to curl up in that chair with a good book.  I love entries that invite in.   The ladder makes a unique statement and balances the oversized basket of sunflowers on the door!  Love, love love, the sunflowers.

Keeping it simple and clean. Sometimes the understated speak the loudest

I'm not a fan of Halloween or Halloween decor but I have to admit, these little mice are cute.

Monograms!!! I love monograms!

These unique wreaths are so cool.  I am going to add that to my list of weekend projects! 


This is my all time favorite entry!  I can't say exactly what I love about it but it is beautiful.

(pictures from Shelterness.com)
Are you excited for Fall?